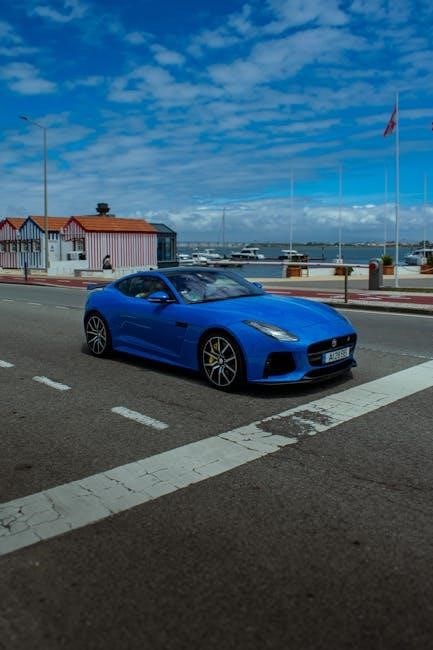
The Jaguar F-Type is a sleek, powerful sports car that embodies elegance and performance. Its introduction of a manual gearbox enhances driver engagement, blending tradition with modern sophistication.
1.1 Overview of the Jaguar F-Type Model
The Jaguar F-Type is a two-door sports car renowned for its sleek design and powerful performance. Available as both a Coupe and Convertible, it combines luxury with agility, offering a range of engine options, including V6 and V8 powertrains. The introduction of a manual gearbox in select models enhances its appeal to driving enthusiasts, providing a more engaging experience. With rear-wheel or all-wheel-drive configurations, the F-Type delivers a blend of precision handling and refined interior comfort, solidifying its reputation as a modern classic in the sports car segment.
1.2 Historical Context of the F-Type
The Jaguar F-Type debuted in 2012 as a spiritual successor to the iconic E-Type, reviving Jaguar’s legacy in sports cars. Initially launched with an eight-speed automatic, the F-Type gained a manual gearbox option in 2016 for V6 models, catering to driving purists. This move marked a return to Jaguar’s roots, offering a more tactile driving experience. The manual transmission became a defining feature, enhancing the car’s appeal among enthusiasts and solidifying its place in Jaguar’s heritage as a driver-focused sports car.
1.3 Significance of the Manual Gearbox Option
The manual gearbox option in the Jaguar F-Type holds significant importance as it caters to driving purists, offering a more tactile and engaging experience. Introduced in 2016 for V6 models, it responded to enthusiast demand, blending tradition with modern performance. This feature not only enhances driver involvement but also pays homage to Jaguar’s sports car heritage. The manual transmission became a defining element for the F-Type, appealing to those who value the connection between driver and machine, and distinguishing it in a market dominated by automatics.

The Decision to Introduce a Manual Gearbox
Jaguar introduced the manual gearbox in 2016 for V6 models, responding to enthusiast demand for a more engaging driving experience, enhancing the F-Type’s sporty appeal.
2.1 Consumer Demand for Manual Transmissions
Enthusiasts and driving purists clamored for a manual option, leading Jaguar to introduce the six-speed manual gearbox in 2016. Despite lower sales expectations, the manual appealed to those seeking a more tactile and engaging driving experience, aligning with the F-Type’s sporty identity. This move acknowledged the emotional connection drivers have with manual transmissions, catering to a niche yet passionate audience.
2.2 Jaguar’s Response to Market Feedback
Jaguar listened to consumer demand and responded by introducing a six-speed manual gearbox for the F-Type in 2016. Available on V6 models, this option catered to driving enthusiasts seeking a more engaging experience. By offering the manual, Jaguar acknowledged the emotional connection drivers have with manual transmissions, blending tradition with modern performance. This strategic move enhanced the car’s appeal, positioning it as a driver-focused alternative in the luxury sports car market.
2.3 Engineering Challenges and Solutions
Introducing the manual gearbox posed engineering challenges, particularly in synchronizing it with the V6 engines. Jaguar collaborated with ZF Friedrichshafen to develop a six-speed manual transmission, ensuring precise shifting and compatibility. The gearbox was designed for rear-wheel-drive V6 models, requiring careful calibration to maintain the F-Type’s dynamic balance. Engineers focused on achieving a short-throw action and mechanical feel, enhancing driver engagement while preserving the car’s refined character. This solution successfully integrated tradition with modern performance, addressing both technical and enthusiast demands.

Design and Engineering of the Manual Transmission
Jaguar collaborated with ZF Friedrichshafen to develop a six-speed manual transmission, ensuring precise shifting and compatibility with the F-Type’s V6 engines. The gearbox was engineered for smooth integration with the powertrain, offering a short-throw action and mechanical feel that enhances driver engagement while maintaining the car’s refined character.
3.1 Development Process of the Six-Speed Manual
The development of the six-speed manual transmission for the Jaguar F-Type involved a meticulous engineering process. Jaguar collaborated with ZF Friedrichshafen to design a gearbox that would complement the car’s dynamic capabilities. The transmission was tested extensively, with a focus on achieving a short-throw action and precise shifting. Engineers aimed to create a mechanical feel that would resonate with driving enthusiasts. The result was a gearbox that seamlessly integrated with the F-Type’s V6 powertrain, offering a blend of performance and driver engagement.
3.2 Collaboration with ZF Friedrichshafen
Jaguar partnered with ZF Friedrichshafen, a renowned transmission specialist, to develop the six-speed manual gearbox for the F-Type. This collaboration ensured the gearbox met Jaguar’s high standards for performance and reliability. ZF’s expertise in transmission design helped optimize the gear ratios and synchronization, providing smooth and precise shifts. The partnership was crucial in delivering a manual option that aligned with the F-Type’s dynamic driving experience, satisfying the demands of enthusiasts who craved a more engaging drive.
3.3 Integration with the F-Type’s Powertrain
The manual gearbox was specifically designed to integrate seamlessly with the F-Type’s powertrain, particularly the supercharged V6 engines. Engineers ensured the transmission’s gear ratios and clutch system were optimized for the V6’s torque delivery, providing smooth and responsive acceleration. The manual option was initially offered only on rear-wheel-drive models, maintaining the car’s dynamic balance and driver-focused character. This integration enhanced the overall driving experience, offering enthusiasts precise control and a more immersive connection to the vehicle’s performance capabilities.

Performance Comparison: Manual vs. Automatic
The manual gearbox offers enhanced driver engagement and precise control, while the automatic provides faster acceleration. Both options deliver exceptional performance, catering to different driving preferences and styles.
4.1 Acceleration and Speed
The manual gearbox in the Jaguar F-Type offers precise control, allowing drivers to optimize acceleration through manual shifting. While the automatic variant delivers faster 0-60 mph times due to its rapid shifting, the manual provides a more engaging driving experience. The F-Type’s supercharged V6 engines, paired with the manual transmission, still achieve impressive acceleration, making it a formidable choice for enthusiasts who prioritize driver involvement over outright speed. The manual gearbox enhances the connection between car and driver, delivering a thrilling yet refined performance.
4.2 Handling and Driver Involvement
The manual gearbox in the Jaguar F-Type elevates driver engagement by providing a more tactile connection to the car. Shifting gears manually allows for precise control, enhancing the overall handling experience. The direct mechanical feedback fosters a deeper involvement in the driving process, making the F-Type feel more responsive and dynamic. This setup particularly appeals to enthusiasts who value the interactivity of a manual transmission, as it complements the car’s agile handling and sporty demeanor, creating a more immersive driving experience.
4.3 Fuel Efficiency and Emissions
The manual gearbox in the Jaguar F-Type offers comparable fuel efficiency to its automatic counterpart, with slight variations depending on driving style. Manual transmissions typically allow drivers to optimize acceleration and gear usage, potentially improving economy in real-world conditions. Emissions remain consistent with the F-Type’s standards, ensuring the manual option aligns with environmental regulations. This balance of performance and efficiency makes the manual gearbox a viable choice for drivers seeking both excitement and practicality behind the wheel.

Driver Engagement and Experience
The manual gearbox enhances engagement, blending tradition with modern sophistication. It appeals to driving enthusiasts, offering precise shift quality and pedal coordination, delivering real-world benefits and pure driving joy.
5.1 The Appeal of Manual transmissions
5.1 The Appeal of Manual Transmissions
The appeal of manual transmissions lies in their ability to enhance driver engagement and connection to the vehicle. Enthusiasts appreciate the tactile experience of shifting gears, which fosters a sense of control and involvement. In the Jaguar F-Type, the manual gearbox caters to this passion, offering precise shifts and a mechanical feel that complements the car’s dynamic performance. This feature attracts driving purists who value the tradition and joy of manual driving over the convenience of automatic transmissions.
5.2 Driver Feedback and Reviews
Drivers and reviewers have praised the manual gearbox in the Jaguar F-Type for its smooth, mechanical shifts and engaging driving experience. Many enthusiasts appreciate the tactile connection it provides, enhancing the car’s dynamic character. While some note it may not be perfect, the manual transmission is widely regarded as a worthy option for purists. Feedback highlights the gearbox’s ability to make everyday driving more enjoyable, even in traffic, by adding a sensory dimension. However, opinions are mixed, with some preferring the convenience of the automatic over the manual’s added involvement.
5.3 The Role of the Manual in Enhancing Driving Dynamics
The manual gearbox in the Jaguar F-Type plays a crucial role in enhancing driving dynamics by offering precise control and a direct connection to the vehicle. It allows drivers to fully engage with the car’s performance capabilities, making every shift a deliberate and satisfying action. This tactile interaction heightens the driving experience, especially on winding roads or during spirited driving sessions. The manual transmission complements the F-Type’s sporty nature, providing a more immersive and responsive feel that aligns with the car’s DNA as a driver-focused sports car.

Driving the Jaguar F-Type Manual
Driving the Jaguar F-Type Manual offers a unique blend of engagement and precision, providing a direct connection to the car’s performance, ideal for driving enthusiasts.
6.1 First Impressions and Initial Thoughts
Initial impressions of the Jaguar F-Type Manual highlight its engaging driving experience. The smooth, precise shifts and responsive clutch create a sense of connection to the road. Drivers appreciate the manual’s ability to enhance control and involvement, making every drive feel dynamic and personal. The integration of the manual gearbox with the V6 engine is seamless, offering a balanced blend of power and finesse that caters to enthusiasts seeking a more immersive driving experience.
6.2 Real-World Performance and Handling
The Jaguar F-Type with a manual gearbox delivers a responsive and engaging driving experience; The smooth, precise shifts complement the V6 engine’s power, offering a balance of performance and finesse. On winding roads, the manual transmission enhances control and precision, making the car feel more connected to the driver. Its rear-wheel-drive setup, paired with the manual gearbox, provides a dynamic and immersive handling experience, appealing to enthusiasts who value a more interactive connection with their vehicle.
6.3 Comparison with the Automatic Variant
The manual gearbox in the Jaguar F-Type offers a more engaging and interactive driving experience compared to the automatic variant. While the automatic provides seamless and quick shifts, the manual transmission adds a layer of driver involvement, making the car feel more connected and responsive. However, the automatic is more convenient in traffic and delivers slightly faster acceleration times. Ultimately, the manual variant appeals to purists who prioritize driving dynamics and a tactile connection, whereas the automatic suits those seeking comfort and ease of use.

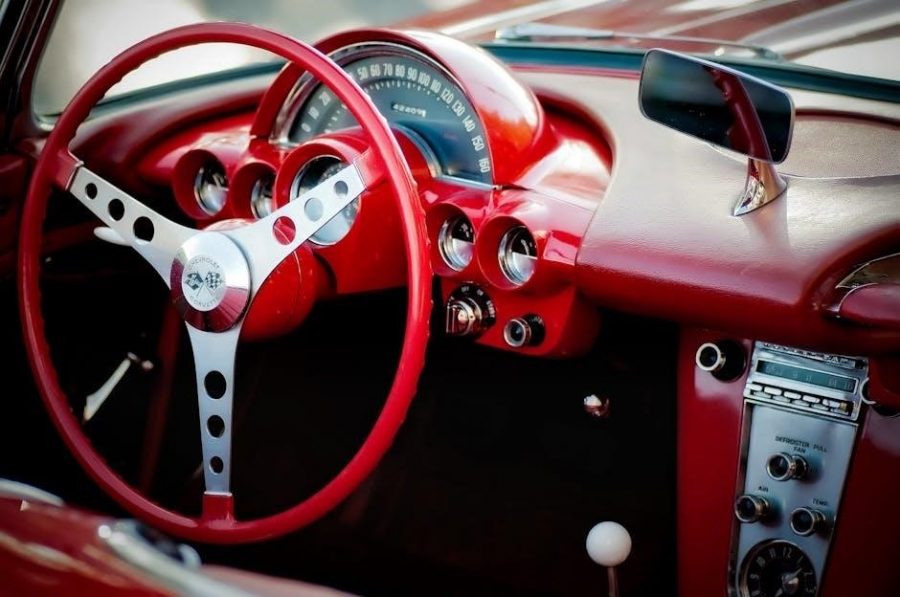
Technical Specifications of the Manual Gearbox
The Jaguar F-Type features a six-speed manual gearbox sourced from ZF, offering smooth, precise shifts. It is available on rear-wheel-drive V6 models, with optimized gear ratios for performance and efficiency.
7.1 Gear Ratios and Synchronization
The six-speed manual gearbox in the Jaguar F-Type features carefully optimized gear ratios designed to enhance both performance and driver engagement. Each gear is precisely synchronized to ensure smooth, seamless shifts. The ratios are calibrated to match the torque characteristics of the V6 engine, providing excellent acceleration and responsiveness. This setup allows drivers to fully exploit the engine’s power band, making the driving experience more dynamic and enjoyable. The manual transmission’s synchronization system is robust, ensuring durability and consistent performance over time.
7.2 Clutch Design and Operation
The Jaguar F-Type’s manual gearbox features a lightweight, hydraulically operated clutch designed for smooth engagement and disengagement. The clutch pedal offers a progressive action, providing clear feedback to the driver. Its balanced weight ensures ease of use while maintaining a sporty feel. The clutch’s design emphasizes consistency and precision, allowing drivers to execute seamless shifts. This setup enhances the overall driving experience, making it both engaging and accessible for enthusiasts. The clutch’s reliability and responsiveness are key to the manual transmission’s appeal in the F-Type.
7.3 Compatibility with V6 Engines
The manual gearbox in the Jaguar F-Type is specifically designed to work in harmony with the V6 engines, offering a sporty and engaging driving experience. Available on both the 340hp and 380hp V6 models, the six-speed manual transmission is optimized for rear-wheel-drive configurations. This pairing ensures smooth power delivery and precise control, making it a favorite among driving enthusiasts. The manual gearbox’s compatibility with the V6 engines highlights Jaguar’s commitment to blending performance with driver involvement, creating a dynamic and enjoyable ride.

Market Reception and Sales Performance
The manual gearbox option in the Jaguar F-Type was well-received by driving enthusiasts, with steady sales figures reflecting its appeal to a niche market segment.
8.1 Initial Sales Figures and Projections
The Jaguar F-Type manual gearbox saw modest initial sales, with only one in ten buyers opting for it. Despite this, the model met projections, appealing to purists seeking a more engaging drive. The manual variant, available on V6 models, contributed to the F-Type’s market position as a driver-focused sports car, aligning with Jaguar’s strategy to cater to enthusiasts while maintaining broader appeal.
8.2 Impact on the F-Type’s Market Position
The introduction of the manual gearbox bolstered the Jaguar F-Type’s appeal as a driver-focused sports car, enhancing its market position. It catered to enthusiasts seeking a more engaging driving experience, distinguishing the F-Type from competitors prioritizing automatics. This move solidified Jaguar’s reputation for blending tradition with modern performance, attracting purists while maintaining its broader market presence. The manual option became a key differentiator, reinforcing the F-Type’s identity as a dynamic and desirable sports car.
8.3 Buyer Demographics and Preferences
Buyers opting for the manual Jaguar F-Type are predominantly driving enthusiasts who value an engaging experience. This demographic often includes purists and sports car aficionados seeking a connection to the road. The manual gearbox appeals to younger, passionate drivers who prefer control and precision. Additionally, it attracts those who appreciate the heritage of manual transmissions, aligning with Jaguar’s legacy of performance and handling. These buyers prioritize driving dynamics over convenience, making the manual F-Type a niche yet sought-after choice within the sports car market.

Owner Feedback and Long-Term Reviews
Owners praise the manual F-Type for its engaging, precise shifts, enhancing the driving experience. Reliability and maintenance reports are generally positive, with strong resale value noted.
9.1 Common Praises and Criticisms
Owners widely praise the manual F-Type for its smooth, precise shifts and enhanced driver engagement. The gearbox is lauded for its snappy, mechanical action, appealing to driving enthusiasts. However, some critics argue that the manual does not significantly outperform the automatic in acceleration and that the clutch pedal can feel heavy in traffic. Despite this, the manual remains a beloved option for those prioritizing driving involvement, even if it isn’t a perfect match for the car’s refined nature.
9.2 Reliability and Maintenance Reports
The manual gearbox in the Jaguar F-Type has shown reliable performance, with smooth and precise shifts reported by owners. Developed in collaboration with ZF, the six-speed manual is known for its durability and mechanical precision. Maintenance requirements are typical for manual transmissions, with regular clutch and gear fluid checks recommended. Long-term reliability has been consistent, though some owners note that heavy clutch pedal use in traffic can be tiring. Overall, the manual gearbox has proven to be a robust and trustworthy option for F-Type enthusiasts.
9.3 Resale Value and Market Trends
The Jaguar F-Type with a manual gearbox tends to hold its value well, particularly among driving enthusiasts who prize the tactile experience of manual transmissions. While automatic variants dominate sales, the manual version retains a niche appeal, often commanding higher resale prices due to its exclusivity. Market trends show consistent demand for manual F-Types, especially in regions where driving engagement is prioritized. Over time, the manual gearbox may become a desirable feature for collectors, further enhancing its resale value and long-term appeal.

The Manual Gearbox in the Broader F-Type Lineup
The manual gearbox in the F-Type lineup is exclusive to V6 models, enhancing driving engagement. Developed with ZF, it underscores Jaguar’s commitment to driver-centric experiences.
10.1 Positioning Within the Model Range
The manual gearbox is positioned as a niche offering within the F-Type lineup, catering to driving purists. Available exclusively on rear-wheel-drive V6 models, it targets enthusiasts seeking a more tactile driving experience, while automatic and AWD variants appeal to a broader audience. This strategic positioning allows Jaguar to maintain the F-Type’s reputation as a dynamic sports car, blending heritage with modern performance capabilities.
10.2 Target Audience and Marketing Strategy
The manual gearbox in the F-Type primarily targets driving enthusiasts and purists who value tactile engagement. Jaguar’s marketing emphasizes the emotional connection and driving dynamics that a manual transmission offers, appealing to a niche audience within the sports car market. This strategy highlights the F-Type’s heritage and exclusivity, positioning it as a driver-focused alternative to competitors increasingly dominated by automatics;
10.3 Future Prospects for Manual Transmissions
The future of manual transmissions in the F-Type and broader market remains uncertain. While enthusiasts advocate for manuals, declining demand and rising automation trends suggest their niche appeal. Jaguar may continue offering manuals in select models to cater to purists, but volumes are likely to remain low. The brand’s focus on innovation and performance could see manuals phased out in favor of advanced automatics, unless demand rebounds or regulatory changes favor driver engagement.
The Jaguar F-Type manual gearbox stands as a testament to driver engagement, offering a unique experience for enthusiasts. Its legacy underscores the enduring appeal of manual transmissions.
11.1 Summary of the Manual Gearbox’s Impact
The manual gearbox in the Jaguar F-Type has significantly enhanced driver engagement, offering a more immersive experience. Developed in collaboration with ZF, it provides precise shifts and a mechanical feel. This option catered to driving enthusiasts, blending tradition with modern performance; The manual transmission not only elevated the F-Type’s appeal but also positioned Jaguar as a brand that values driver involvement. Its introduction reinforced the car’s reputation as a dynamic sports car, balancing heritage and innovation.
11.2 Legacy of the Manual F-Type
The manual F-Type has left a lasting impression on Jaguar’s legacy, appealing to driving purists who cherish tactile engagement. Its introduction in 2016 marked a commitment to traditional driving experiences amidst rising automatic dominance. Enthusiasts praised the precise, mechanical feel of the six-speed gearbox, enhancing the car’s dynamic character. The manual F-Type became a symbol of Jaguar’s dedication to driver involvement, cementing its reputation as a true sports car. Its legacy endures as a testament to the joy of manual driving in a modern era.
11.3 Potential for Future Manual Models
The success of the manual F-Type highlights Jaguar’s potential to continue offering manual transmissions in future models. Collaborations with ZF Friedrichshafen have proven fruitful, ensuring precise and engaging gearboxes. While automatics dominate, the niche demand for manuals remains significant, particularly among enthusiasts. Jaguar’s commitment to driver involvement suggests that manual options could persist, even as the industry trends toward automation. This strategy not only honors driving traditions but also appeals to purists, reinforcing Jaguar’s identity as a brand that balances heritage with innovation.